Friday, January 30, 2009

Holey Dooley...


My cupcakes are featured on Cupcakes Take the Cake!! I can't believe it. I HAVE ARRIVED!

Tuesday, January 27, 2009

TWD: Fresh Ginger and Chocolate Gingerbread

This week Heather over at A Sherry Trifle chose Fresh Ginger and Chocolate Gingerbread for us bakers to make. Pretty straightforward and easy to produce it was warm, spicy, chocolaty and gingery.

I had a 9" pan sitting in my cupboard so I made the whole recipe with no problems...my pan however was a stoneware pan from Pampered Chef. The edges and the bottom of the cake got really done while the middle was just cooked through. No biggie, I just cut 1/2" from each side and ate those bits myself. A little burnt but still yummy.

The fresh ginger was easy to chop up with my new Santoku knife!! Added to the sugar it made a nice little syrup in itself. I used bittersweet chocolate chips so I didn't have to chop any chocolate up and I used candied ginger from Trader Joe's in place of the stem ginger. (I didn't even look for that in the store) Oh yeah, I used duck eggs...man do those things have tough shells!

I waited a day to try this yummy cake (except for the edges I cut) ...and I am glad I did. The flavors blended and mellowed I think. I especially like the addition of chocolate, both in the cake and the frosting. Now, I just need to give 3/4 of it away so I don't eat it all myself!

I will post a photograph tomorrow as we were skiing all day today and there wasn't enough light outside when we got home to photograph the cake.

Don't forget to check here for all the other lovely cakes!

Sunday, January 25, 2009

BB: Easy Sticky Buns

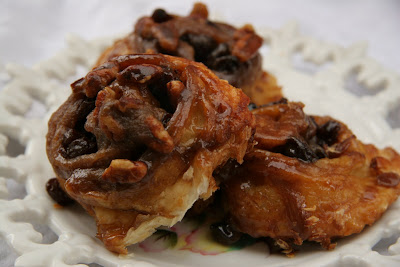
and were they every easy...and sticky...and I suppose, buns. These were chosen by Melissa of Made by Melissa for the BBs to make.


They were so easy that I had hoped my family would like them so that I could make them again and again and again...however, they did not (only one of the boys liked them, that's not enough...I would end up eating them all myself, again!)


I made half with chopped pecans and left half without. I ended up giving away half of the buns just to get them out of my house. Sweet, cinnamony, sticky and soft. I took them out of the oven 5 minutes early so they would stay soft. I had a lot of spillage...I mean a lot! I'm wondering if one could cut down on the butter/brown sugar mixture in the bottom of the muffin tin to cut down? Needless to say, it was fairly easy to clean up and I did put parchment on the sheet pan so I just scooped the whole mess up and tossed it.


Here you go:

Easy Sticky Buns

12 tablespoons (1 1/2 sticks) unsalted butter, at room temperature
1/3 cup light brown sugar, lightly packed
1/2 cup pecans, chopped in very large pieces
1 package (17.3 ounces/2 sheets) frozen puff pastry, defrosted for the filling
2 tablespoons unsalted butter, melted and cooled
2/3 cup light brown sugar, lightly packed
3 teaspoons ground cinnamon
1 cup raisins

Preheat the oven to 400 degrees. Place a 12-cup standard muffin tin on a sheet pan lined with parchment paper.

In the bowl of an electric mixer fitted with the paddle attachment, combine the 12 tablespoons butter and 1/3 cup brown sugar. Place 1 rounded tablespoon of the mixture in each of the 12 muffin cups. Distribute the pecans evenly among the 12 muffin cups on top of the butter and sugar mixture.

Lightly flour a wooden board or stone surface. Unfold one sheet of puff pastry with the folds going left to right. Brush the whole sheet with half of the melted butter. Leaving a 1-inch border on the puff pastry, sprinkle each sheet with 1/3 cup of the brown sugar, 1 1/2 teaspoons of the cinnamon, and 1/2 cup of the raisins. Starting with the end nearest you, roll the pastry up snugly like a jelly roll around the filling, finishing the roll with the seam side down.

Trim the ends of the roll about 1/2 inch and discard. Slice the roll in 6 equal pieces, each about 1 1/2 inches wide. Place each piece, spiral side up, in 6 of the muffin cups. Repeat with the second sheet of puff pastry to make 12 sticky buns.

Bake for 30 minutes, until the sticky buns are golden to dark brown on top and firm to the touch. Allow to cool for 5 minutes only, invert the buns onto the parchment paper (ease the filling and pecans out onto the buns with a spoon), and cool completely.

Thursday, January 22, 2009

Still working on those lemons....

I decided to use up the last of my Meyer Lemons by making Meyer Lemon Marmalade. Don't get me wrong, I still have 20 pounds of regular lemons my friend Michele brought over from her tree...(yes, the same Michele of the persimmon tree)....I think I will make some lemon loaves with those.


This recipe was very easy...it does take 2 days to complete though as the sliced up lemons soak in water overnight. I processed the jars in a water bath to that they could sit in my pantry for a while and be used as gifts later. I did keep one jar in my fridge for my sole consumption...one word: YUM!


Here's the recipe:

Meyer Lemon Marmalade Gourmet | December 1999

Yield: Makes 6 (1/2-pint) jars
Active Time: 1 1/4 hr
Total Time: 25 1/4 hr

Ingredients:

6 Meyer lemons (1 1/2 pounds)
4 cups water
4 cups sugar

Special equipment:
Cheesecloth
Kitchen string
6 (1/2-pint) Mason-type jars, sterilized

Halve lemons crosswise and remove seeds. Tie seeds in a cheesecloth bag. Quarter each lemon half and thinly slice. Combine with bag of seeds and water in a 5-quart nonreactive heavy pot and let mixture stand, covered, at room temperature 24 hours.

Bring lemon mixture to a boil over moderate heat. Reduce heat and simmer, uncovered, until reduced to 4 cups, about 45 minutes. Stir in sugar and boil over moderate heat, stirring occasionally and skimming off any foam, until a teaspoon of mixture dropped on a cold plate gels, about 15 minutes.

Ladle hot marmalade into jars, filling to within 1/4 inch of top. Wipe rims with dampened cloth and seal jars with lids.

Put jars in a water-bath canner or on a rack set in a deep pot. Add enough hot water to cover jars by 1 inch and bring to a boil. Boil jars, covered, 5 minutes and transfer with tongs to a rack. Cool jars completely.


Cooks' note:
• Marmalade keeps, stored in a cool, dark place, up to 1 year.

**Just a note, the recipe doesn't indicate when to take the bag of seeds out...I boiled the mixture with the bags of seeds and then removed it before spooning it into jars.

Wednesday, January 21, 2009

TWD: Berry Surprise Cake


Well...here I am...a day late and more than a dollar short. We have Mary Ann from Meet Me in the Kitchen for this week's TWD choice. My Berry Surprise Cake almost wasn't a cake at all. I was going to do the playing around alternative with the berries, filling and whipped cream topping...but after reading about the cake on the TWD site, I decided to go ahead and try it. And to tell you the truth, I LOVE TO EAT CAKE!

The cake part was fairly easy but did involve a lot of steps. I was very very careful not to over mix the batter but also wanted to get all of the flour incorporated. I think I did OK. I didn't have an 8" springform pan so I used the 9". My cake did sink a little in the middle but nothing catastrophic. The layer was however a little on the thin side so instead of the hole out of the middle, I sliced the cake into two layers and went from there. I didn't have any Chambord for the syrup so I used Cream de Cassis instead. After slicing the cake into two layers, I brushed on the sugar syrup...unsure when to stop as Dorie said there would be extra but didn't day how much extra. I just guessed. I threw an extra tablespoon of sugar into the filling based on the suggestions from other bakers..I thought some lemon zest might be nice as well....maybe next time.


I did like the fact that I didn't have to wash the mixing bowl after every use...just keep adding ingredients to the dirty bowl and move on! I did actually have blackberries for the filling and top of the cake...but when I went to add them to the filling...my kids had eaten the entire basket! Good thing I had the blueberries...or it would have just been a Surprise Cake!


I did actually make this cake yesterday (Tuesday) but by the time I was finished...the light was gone, I couldn't get a photograph and I had to go to karate with the oldest kid. We will have this for dessert tonight. I will let you know what I think tomorrow.

Don't forget to check out what the other bakers here accomplished here.

Jeez...I need me a cake plate!!

Thursday, January 15, 2009

When life gives you lemons....

....make Lemon Bars!!


These fabulous lemon bars are from Cafe Johnsonia. The crust is just the right size. Not too thick that it's all you taste and not too thin to hold up the wonderfulness of the lemon filling....oh the filling. It is pretty much doubled from any other recipe I found and it is perfect for the lemon lover. Here is my sunshine on a plate!


Tuesday, January 13, 2009

TWD: Savory Corn and Pepper Muffins


This week's selection was chosen by the very funny and witty Rebecca over at Ezra Pound Cake. She chose the first savory recipe to be made by the group: Savory Corn and Pepper Muffins. I made these muffins just like the recipe stated. I did use very coarse ground cornmeal which made for a bigger, crumbly crumb in my muffins. I did leave out the jalapeƱo but chopped up a red bell pepper and added that to half of the batch along with the cilantro. I wasn't sure if the oldest kid would see the red and freak out! He loves corn though, but I didn't have any fresh corn around so I used frozen which didn't seem to matter. I would have liked to add some shredded cheddar cheese to the batter but only thought of it after the muffins were scooped into the pan. I thought the cheese would burn if I sprinkled it on top of the muffins.

All in all...a pretty tasty side dish. A lot of the other bakers made theirs to go with chili...which is what I would have done too had I not already planned to make this yummy Lentil Sausage Soup from The Barefoot Contessa.


This recipe makes a ton and it was really tasty. I crumbled a muffin into my soup and it was crazy good!

Have a look here for some more outstanding muffins.

Thanks Rebecca!

Thursday, January 8, 2009

I am now a Barefoot Blogger!


As if I didn't have enough to do...I joined another group! Barefoot Bloggers! I had ulterior motives for this one though. They sometimes make real meals!! (As opposed to the baking group) Thinking ahead...I realized that I could kill two birds with one stone here. I would have dinner for the family and my blog entry all in one. Sadly, the first entry was breakfast but hey, it was still a meal as opposed to a dessert.
Karen from Something Sweet chose Banana Sour Cream Pancakes. These were easy and yummy and my kids loved them. The only thing I changed was the fruit used in the recipe. I used raspberries and blueberries as opposed to bananas because, well...no one wanted bananas in their pancakes! Check out the others here to see their versions of these light and fluffy pancakes.


Banana Sour Cream Pancakes
Cookbook: 2003’s Barefoot Contessa Family Style
Show: Barefoot Contessa Episode: Back to School

Ingredients
1 1/2 cups flour
3 tablespoons sugar
2 teaspoons baking powder
1 1/2 teaspoons kosher salt
1/2 cup sour cream
3/4 cup plus 1 tablespoon milk
2 extra-large eggs
1 teaspoon pure vanilla extract
1 teaspoon grated lemon zest
Unsalted butter
2 ripe bananas diced, plus extra for serving (I used blueberries and raspberries)
Pure maple syrup

Directions
Sift together the flour, sugar, baking powder, and salt. In a separate bowl, whisk together the sour cream, milk, eggs, vanilla, and lemon zest. Add the wet ingredients to the dry ones, mixing only until combined.

Melt 1 tablespoon of butter in a large skillet over medium-low heat until it bubbles. Ladle the pancake batter into the pan to make 3 or 4 pancakes. Distribute a rounded tablespoon of bananas on each pancake. Cook for 2 to 3 minutes, until bubbles appear on top and the underside is nicely browned. Flip the pancakes and then cook for another minute until browned. Wipe out the pan with a paper towel, add more butter to the pan, and continue cooking pancakes until all the batter is used. Serve with sliced bananas, butter and maple syrup.

Thursday, January 1, 2009

Happy Happy New Year!!

My first blog entry of 2009! Wow...has a year really gone by?? It's hard for me to believe it yet here it is!!

Ok, ok....everyone had such very nice comments about my last TWD entry...remember the Tall and Creamy Eggnog Cheesecake? The one I didn't like...then let it sit overnight again...then liked it but not enough to eat it? Well...I transformed it! And I like it much better now that it is covered in dark chocolate! (Really, who wouldn't?)


I started out scooping with my 1/4 cup disher...because that is the only size I have...and I just scooped the cake...crust and all...into balls. They are a little bigger than I would have wanted but I wasn't being picky.


I didn't have any sticks so I put the balls into the fridge and went to get sticks from Michaels. On the way there my car blew a radiator hose! I pulled into the parking lot of Safeway with my 7 year old and steam pouring out from under the hood. You see, at this point I didn't know it was the hose...I just saw "smoke". I called the husband and he asked if it was smoke or steam coming out...uhhh, what would be the difference? Well, apparently, smoke is more opaque and steam just kind of mists out....whatever....after I hung up on him, he came to my rescue. After replacing the hose, picking up my 4 year old from preschool and finally getting home at 5pm, I was able to stick the sticks in the balls and put them in the freezer, for 15 minutes! I still had to dip and roll before heading to the New Year's Eve Party!!!


I melted a pound of dark chocolate (Trader Joe's) with 2 tablespoons of butter in a double boiler. Dipped the not yet frozen, too big cheesecake balls into the melted chocolate (ending up with some misshapen oblong balls). My boys helped me by sprinkling graham cracker crumbs and red and green sprinkles on top. I put them back in the freezer for 7 minutes, wrapped those suckers up and took off to the party where they were very much enjoyed by all! And best of all...THE CHEESECAKE IS NOT IN MY FRIDGE ANYMORE!!!